Monday 29 March 2010

Vis Comms Session 29 Mar 10

29 March 2010

Trials and Tribulations

Basic assignment brief:

1. Design and produce a short (min 30 secs, max 60 secs) advert using animation, video or a combination of mixed media

2. Investigate the use of sound for your film/animation - this might include a full soundtrack where possible or a written sound-plan (storyboard times, what kind of sound/music? male/female voice? which song?)

3. Undertake research into health care related campaign advertising. This should include visual examples and annotation in your sketchbook or blogs.

4. A sketchbook or blog containing support work including images, examples, written notes, any artist research, other health and community related research, analysis of outcomes etc to date.

5. A written evaluation of the design process, related to your own work - minimum of 2000 words, maximum 3000.

Due in around the end of May.

To do today:
  • make small movie/animations with plastic figures in Photoshop and Premier Pro - save and upload to blog
  • change Megan video to Prem Pro file and upload to 15.3.10 blog
  • research LEAP advertising examples, if any and children's art projects
  • look at Cell Animation examples
  • print blog up to now - all posts
  • look at animation with plastic figures in Photoshop

Had a animation using Photoshop session with John from year 2. Found it very complicated at first - a lot to take in and everyone is different in their methods.

Open up Photoshop

At WINDOW - drag down and let go on ANIMATION

Make sure your background layer is BLANK.

Each photo will be opened in a new layer

  • eg make a new layer

  • open up first photo

  • cut and paste the photo into your new layer

  • resize to fit the frame using edit, transform, scale

  • press return to finish/get rid of scaling.
  • hide the previous layer, then open up a new layer with your next photo

  • do this will all your photos

  • on Animation (Frames) timeline (at bottom of screen) put each of your layered photos starting with frame 1.

  • to repeat the frames (so they go fast) hit the 'layer' button on bottom of timeline say, 6 times.


  • on the last frame of a layer (eg frame 7) 'hide' it in your layers - the frame will become blank. Then click on your next layer/photo and this will then appear in frame 7.

  • repeat this frame 7 times.

  • hide the 7th frame and click on next new layer/photo etc

  • run movie to see how it looks (top right hand of screen)

SAVE AS A PHOTOSHOP (PSD.PDD) FILE - this will mean you can work on it again in future

If you have finished save it as a video file

Go to: FILE - EXPORT - RENDER VIDEO Size: Pal DI 768 x 576 Frame Rate: 25 MUST BE THIS SIZE


CHOOSE AVI file


The photos you use may be large which is why you must render it to the right size.


PUT PHOTOSHOP VIDEO HERE - upload from youtube
can't save the Photoshop file to AVI from my laptop at home - !! Very frustrating - means I have to do everything while in the computer room at college which is restricting if there's not enough time to edit etc there.

Also wanted to do this in Premier Pro as I'd been unable to do this before.


  • Open up Premier Pro

  • Settings: STANDARD: 48hz - OK

  • EDIT - PREFERENCES - STILL IMAGE

  • Default duration: 3 frames OK

  • PROJECT - PROJECT SETTINGS - GENERAL

  • TICK the 'scale clips to project dimensions when adding to sequence

Import all your photos and drag them onto the timeline.


If they appear very small you can enlarge them and see each frame by clicking on the 'mountains' symbol on bottom of screen.


To copy a frame (eg the first one) highlight all the following frames by creating a box around them and dragging them further along the timeline. This will create a space for you to copy and past your frame into. Click on the frame you want to copy. COPY Remember to put the red frame/postion cursor in place so the frame is pasted in the correct place. Then PASTE.


To save the file


SAVE AS A PREMIER PRO FILE first (so that you can work on it again in future): prproj file


Then save as a movie file:


EXPORT - MOVIE - GENERAL SETTINGS AVI


VIDEO SETTINGS: DV Pal OK


Talked about how the animation will look - so far so good - it's basic but has a certain charm. Think I'll go with the rabbit figure but will try a couple of cut-outs using my images from the last assignment.

Music: start of fairly bare, sombre - a little haunting?

Gradually becomes lighter, add children's laughter and over dub with young voice saying:

Bored? Lonely? Want some creative fun and to make new friends? Come join us at ........date/sessions/LEAP mention Children, parents/carers/ all welcome at our informal arts and craft sessions with opportunities for integrated creative learning and awareness. Fun for all the family

To do over Easter holidays:

  • try cut-outs using my own drawings from last assignment
  • do more rabbit cut-outs - different figures and take lots and lots of photos - put on new memory stick - to edit at college
  • start sketchbook to back up blog/portfolio


Monday 22 March 2010

Vis Comms session 22/3/10

  • 22/3/10

    Outline for next couple of weeks
  • finish storyboard/animatics
  • use either film or animation to produce 30/60 second narrative
  • evaluate any outcomes
  • experiment with different techniques. Identify what style you would like to use for the project (final) after Easter


  • Things to ask Julie today:
  • can't save print screen in Photoshop (to upload onto blog) - you can save a Word document (from home) as a PDF and then upload this into blog.
  • videos not uploading to blog in spite of compressing them to 39MB. - Try setting up a YouTube account, uploading them there and embedding them. Can then put them up on blog.
  • drawn animation - how many frames? - in DV Pal it's 25 frames per second. Can reduce this by taking one photo and having it on for two frames (e.g: timeline would then be 12 frames per second = 360 frames for 30 second animation.
  • does it matter that the cut-outs are not so flat on the background? - no.. for actual objects that might move about, use blue tac.

Took my rabbit photos and imported them into Premier Pro 1.5

Set Default Duration to 3 frames.

  • To drag all photos onto timeline at once, click on small picture icon next to the file.jpg name and drag onto timeline.


Ran the video and it looked great - if a little 'sketchy' and the frames moved around a bit! I need to get hold of a tripod that will shoot flat on.

Talked briefly about Effects
Apply these to one jpeg at a time.
Double-click on the image - go into EFFECT CONTROLS


Drag into window EFFECTS - VIDEO EFFECTS

For colour - IMAGE CONTROL - TINT - drag into frame in timeline for them to take effect

To take off an effect click on Effect controls in the effects window and click CUT

Will talk about Key Frames next week.

Saved my video - but it's not saved as a DV Pal file - only a movie!!! ahghgh! I need to compress it and can't.

REMEMBER TO ALWAYS SAVE AS A PREMIER PRO file before saving it as a movie!!!

Have set up a YouTube account and here is my video!


Sunday 21 March 2010

Rabbit cut-outs

20/3/10

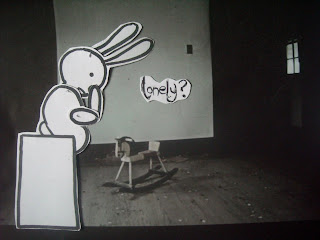
Inspired by a children's book 'Not A Box' by Antoinette Portis I decided to experiment with a rabbit cut-out figure and try to animate that. To say it took a long time is an understatement!! It's a very fiddly process but effective once in place.


To keep the pieces together I used thread, with a small knot at the end of it.


To keep the threads secure use sticky tape on the reverse side, making sure the limbs are still movable


I put the character on the black and white photograph I had used before and took a series of photographs - around 26 in total. I used three different 'rabbit' cut-outs, to show different position and emotions.

This first piece represented the sad character - bored, isolated


Text is gradually introduced - Bored, Lonely?


Then suggestion to improve things - something fun and creative to do


The rabbit character is starting to look up and take notice
He then jumps down off the box - a new rabbit has to be cut out for this


Once off the box the character cut-out changes again - all smiles - and text introduced


At this point I would probably start putting a colour wash on the photograph or try to introduce colour into the background.

From one side comes another rabbit - new friend...


by now pencils have been introduced - real objects - I would add in wax crayons etc..and start putting in drawings, craft pictures etc and LEAP logo and information.

Will see if I can put this into Movie Maker...


Friday 19 March 2010

bits and pieces - 18/3/10

I've been trying to upload the Megan Photoshop animation since Monday and for some reason it won't do it. I've compressed the file to 39mb which should be small enough but it's not having any of it. Opened up that post today via my laptop at home and it shows the video still uploading and I can't take it off - even though I've deleted it in Edit Html!? It still shows Video Processing instead of Upload Video......What's going on?

Today I trawled the charity shops in Beccles to look for small plastic toys with movable parts and came up with these - total cost - less than £1! bargain......


Each piece has movable arms and head so let the fun begin!


I set up the three pieces against a plain background -not easy to get the space in my room and had to set the camera on the edge of the table so it was in the same place for each frame. I then took photos of the pieces, moving them just a little between each one. As there were three of them it was easy to forget what I'd done the frame before so I was constantly checking on my camera.


This is just the first 10 of 24 frames.


I looked through the programmes on my laptop that might help me animate and found WinDVD Creator. It looked as if it was set up with a frame time line so I gave it a go....


Firstly, imported all the photos taken of the figures and put them onto the timeline. Unfortunately the minimum time per frame was 1 second and I couldn't find another way to speed them up so it doesn't look that great as an animation - too slow! It's more like a storyboard.... Have been trying for the last hour to print screen this document but it will not copy into anthing from WindDVD Creator - really frustrating! Saved as TIFF...no good either - can't upload here. Tried prnt screen into Photoshop..nothing! You'll have to take my word for it. Will try and upload 'movie'


Tried -too big... not sure how to compress Will try in Movie Maker!!
Just tried to access Windows Movie Maker from laptop - error messages coming up - no real detail so bang goes that idea for now.

Monday 15 March 2010

Vis Comms session 15/3/10 animation in photoshop

Vis Comms session 15/3/10 Asked Julie about Katy Davis' work and it turns out she used to be at college with her! Her work is done in After Effects and we don't have this here so I can't use that which is a shame. I thought it looked sophisticated! Julie advised me to look at Image Ready tool in Photoshop and to look at Animation using Photoshop tutorials. Here are a couple:


Don't have earphones with me here (must remember for next session) so will listen to these at home. Need to have a go in the studio with Derek - just to see how times/motion works in principal - eg, with a simple object moving around. Will see if I can sort this out for next session and possibly create a decent cut out figure of my own. In the meantime 1. Draw out basic idea in storyboard form 2. Draw out cut-outs - first in black/white and then in colour 3. Find background photographs 4. Incorporate craft materials in the animation - string, corrugated cardboard, cutouts, brass fixings, glitter, twigs, beads etc Concept Small boy, crouched, head in hands, in a lonely empty room on his own, feeling a bit lonely and isolated. Words - bored? lonely? Boy stands up, listens, turns around. Room becomes colourful Arts/crafts materials start to appear: glitter, beads, pencils, pens, paint, shapes, twigs in a huge montage of activity Add in Leap logo and Activities session titles ------------------------------------------------------------------------------------- Compressing Rat Titanic file from last week: lost the damn Premier file - have no idea where it's gone.. really fed up. Still have the video and although it was on my memory stick, when I opened it up, it wasn't there. I have no idea what's going on here. Before I went into complete meltdown I decided to write down how to compress the Premier file instructions: In PREMIER File............Export........Movie click File name: rat titanic Settings: Video Compressor: H.264 --------- OK SAVE - choose where you want to save it to Should save as a compressed Quicktime Movie (as must as you have room for) ------------------------------------------------------------------------------------- will upload my compressed movie as soon as I get hold of the file! Corinne has uploade hers but only 7 seconds has appeared so none of the final frames? Why? We had no error alert - it appeared as if the whole movie had compressed succesfully. Will have to ask Julia why this happens. Apparently you must check the 'workspace' tool covers the whole of your movie. Drag it right to the end of it. ------------------------------------------------------------------------------------- Corinne and I are going to try a little animation of our own using a coffee cup and marker pen, drawing our names on letter by letter. Took photos and will work these into Movie Maker (hope I have this on my laptop) ------------------------------------------------------------------------------------- Looking at animation in photoshop (formerly Image ready) Select a photo you want to use to animate. For this I chose Megan

In Photoshop, go to FILE, OPEN - choose photo Cut Megan out (ie get rid of the background): Select around Megan using Polygon Lasso tool Select - Inverse - CUT You want to put each body part in a different layer so that each can be moved and animated independently 1. Cut out the head Edit .... Cut ....New Layer...Paste 2. Cut out the arm Edit..... Cut ....New Layer...Paste to animate go to WINDOW ....... ANIMATION This brings up frames at the bottom of your screen This duplicates the frame Now on layer 2 (eg the arm) use the Transform - Rotate tool to move the arm up or down. The target icon is where it will move from so position this where you want it move from (eg elbow, shoulder etc) An alternative way to do this is to create a duplicate layer Then TRANSFORM - ROTATE image The TWEENS ANIMATION FRAMES icon at the bottom of the screen will 'add/fill in' frames between your actual frames so they appear smoother when running.


To save this photoshop/animation file so I could upload it to this blog: in Photoshop EXPORT - RENDER VIDEO - save as a MOVIE file (save as a MOV.file) at Settings: choose H264

Size: Compressor PAL 720 x 576. 4:3 Click on RENDER wherever you want to save the file


Saturday 13 March 2010

looking at tutorials..

13/3/10

Today I'm looking through the tutorials Julie put up on Blackboard. Because I really know nothing about animation, my head is swimming with what might be possible to do practically and what might not but until you see what's what, you're never going to know!

Looked at 'How to Animate a Cartoon using Windows Movie Maker'.

http://www.officialwindowsmagazine.com/guides/how-to-animate-your-own-cartoons-using-windows-moviemaker/

but they reccommend you use Wacam Bamboo or a similar tool which I don't have access to. It won't be practical or sophisticated enough to draw all the frames on a mouse pad or with mouse - I've tried and it's rubbish! I need to be able to do work from home also as we have such limited studio time... so onto the next one...

How to Make Stop Motion using Windows Movie Maker


Here a plastic model is being used - I should almost make this easier for myself and use a model but my ideas are based on drawn figures - this is a useful video though as it goes through the processes. I was unable to embed the tutorial up on Blackboard unfortunately. Perhaps today I will go look for a doll or toy to work on and ask if I can incorporate drawings into it. Perhaps have the drawings for background?

Here is a tutorial using cut out drawings...


It is interesting to see the size of the workspace. For some reason I was thinking my drawings would be small and therefore fiddly in cut outs..but it's much bigger which will make it easier

I will try to use a cut out using the drawing of Arthur. The thing that may be tricky is the fact that he's not doing anything specific - it's more about expressing a feeling? Him in a corner of a dark lonely room...and slowly coming out of it through play and learning with others... How? Let's just try to play with the cut outs first...
Also need to get a tripod...

Found this - a lot more like what I want....

This was by Ashlea Caewood at kendal college, Ashlea says "I created this animation for a college project. The project was based on my identity so i decided to focus it on my ambition as an illustrator. I was inspired by Katy Davis who uses a very similar technique in that she uses hand drawn objects and photographic backgrounds. The animation was put together and finished all in photoshop"


so looked further at work by Katy Davis

By Gobblynne. Music video for “Gone Fishing” by Second Person (www.secondperson.net). Dreamy 2D mixed media animated music video about love and finding plenty more fish in the sea.


the soundtracks on both these videos are beautiful also and so suitable...

This is very short but combines photo background, drawn figure and text - which I also want to add..


feeling more inspired... will try and make some figures this afternoon and find a background.

Basic idea

hand drawn figure on a gloomy dark background

looks lonely and sad...no friends... nothing to do....

parent possibly - on the other side of photo..looking the same..

gradually figures turn round to to see a shaft of colour at one side of frame...and the words - bored? lonely? want something fun to do?

this moves into a new scene - a bright photographic background blending from the dark black/white one.. and more drawn figures of happy, colourful children at play, reading, etc (use figures from flyer I did in last assignment)

text in between frames 'LEAP activities - workshops, arts and crafts, storytelling'


I looked at some images online to draw from (as well as the ones I used in the last project)


for the child I found a photograph......


What I needed now was a photographic image as my background - wanted a bleak empty room - found one Google Images. Cropped the title out in Photoshop


Now I needed to experiment with cut outs. I traced the images from the screen, drawing them in outline form only


I then enlarged the boy photo and drew out the basic component parts for a cut out
marking which bit was which.


I traced these pieces on to thin card and cut them out, experimenting with placing them in the right place on the photograph background. At this stage I wanted the boy to be bigger than he'd have normally appeared in a photo as he is the star of this animation. I could use brass fasteners to fix the pieces in place but then the more subtle movements left and right couldn't be achieved so for this experiment I just placed them by hand and moved them gently as required.


These are obviously very crude drawings and need to be a lot more sophisticated to work. I shall have to ask someone if you can draw these in a more professional way and manipulate them accordingly. I just don't know enough basics about the software yet. Would like to see how Katy Davis did hers....

Monday 8 March 2010

Vis Comms Rat Titanic anamatic

Vis Comms session 8/3/10

Anamatics

Corinne and I attempted to put our storyboard into an anamatic in Adobe Premier Pro.

Go to:

New Project - to DV Pal - set to Widescreen 48kHz
Give file a name: rat titanic Press OK

Settings - to make sure the image is in the right format

1. PROJECT - SETTINGS - GENERAL

Tick the scale clips to project dimensions..... box

2. (Duration setting) EDIT - PREFERENCES - STILL IMAGE Default: 75 frames

(if this was for a full animation set to 2 frames) Press OK

3. FILE - IMPORT - select all images you want to import (all your jpeg frames) Click and drag to select all. Then click on OPEN. This will put them into the 'bin' top right hand frame.

To put your images in sequence onto the timeline click on the small picture next to the file name/image and drag this onto the 'timeline'.


Once the frames are on the timeline you can play around with the frame lengths.

Points to note

Time code is not obvious
It is as follows:

00. 00 .00 00
hours mins secs frames

1 second = 24 frames
There are 25 frames per second

so on the timeline it will go to 1.24 to 2.00 which represents 1 second and 24 frames... not 1.24 seconds!!

Move the cursor (vertical red line with blue diamond on top) along to where you want it to be on the timeline and then you can slot frames in against it. Click on the [ and ] to move frames along.

Corrine and I had worked out our frame times beforehand but decided that we would be better off playing back pieces and seeing visually if they needed more or less time and work to approximately 30 seconds in total.

I had got so frustrated beforehand that this was a better method.

On the Monitor (top right hand of screen) do a playback to get a feel of how the film will look. Put the curser (long red line with blue diamond top) on the frame you want to start from, press Play and see what works until your last frame. You can then alter the frame times accordingly. Keep doing this - practicing will help ingrain the processes.

Just as I had got to grips with dragging in frames and setting times, the last two frames were black on screen. It seems as if part of Video 2 timeline is corrupted? So I imported the last two frames onto Video 1 timeline - they appeared to be ok but 18jpg was black again!? No reason why. 19jpg was fine. Can't finish it off properly now.


You can see the black frame in the above print screen document.
You can drag frames onto any of the video timelines as long as they are in sequence. (though why 18jpg hasn't worked is more than I know because in the preview screen it shows up fine - and is not corrupted.

As in InDesign the programme only remembers the links you put access in the first place - so if you're dragging in photos from a memory stick, you must keep the memory stick in all the time you are doing your animation (I think). The access to these files must be the same - day in, day out - you can't move them from one location to another or the programme will not recognise them. I did take my memory stick out at one point but I re-imported them OK. On further investigation Julie discovered that the frames needed RENDERING for some reason.

Go to SEQUENCE - RENDER WORK AREA - this prepares it for viewing. And it worked!

Ran the animation through again - discovered a small gap between frames which I hadn't noticed. In order to see these, you must zoom in as they may not show up otherwise. I lengthened one of the adjoining frames to fill the gap.

To save animation:

FILE - EXPORT - MOVIE
Settings: Choose Microsoft DV AVI (or Quicktime) Check the settings are the same as you started the animation in ie, in this case Video; DV Pal etc.

Monday 1 March 2010

Vis Comms session 1/3/10


1/3/10

Finished storyboarding with Corinne - we're a tale of two halves... mine are on white background and hers are on yellow post-it notes - so should look visually intersting as our 'rat characters' are a little different

We scanned the images one by one in order.

Tip: remember to set the scanner to 'professional mode' so that just the image is scanned rather than the image and everything around it (ie the scanner top itself). As I did not do this with my images we had to crop them in 'Paint' afterwards.

Here is the uncropped image


These are the cropped and 'professional mode' scanned images


Really really frustrated!!!!!!!!! The order I upload the photos in is not the order they show up on the blog. If I go into Compose to try and rearrange the images, they then appear mixed up again in Preview!


Timing to 30 seconds

so: 18 frames in 30 seconds = 1.6 sec average per frame
Points to note: think of any lingering shots/scenes
some shots will be longer than others

We laid out all 18 storyboard frames on a large sheet of paper and thought about the shortest and longest frames and worked from there. We were quite 'frugal' at first which left about 6 seconds to play with at the end. This gave us time to think deeper about the shots that needed more time.

Final decision on timeline:

Frame 1: 2 secs Frame 2: 2 secs Frame 3: 2 secs Frame 4: 1 sec Frame 5: 1.6 secs
Frame 6: 1.6 secs Frame 7: 1.6 secs Frame 8: 1.6 secs Frame 9: 1.5 secs
Frame 10: 2 secs Frame 11: 1 sec Frame 12: 1.6 secs Frame 13: 2 secs
Frame 14: 1.5 secs Frame 15: 2 secs Frame 16: 1.5 secs Frame 17: 2 secs
Frame 18: 1.5 secs TOTAL: 30 secs

In the next session Julie will take us through Premier Pro - an animation programme - so that we can put these up in sequence in the 30 second time frame. We will also look at taking photos of each frame and animating that way.

Talked to Julie about my possible assignment ideas. I had thought of doing all drawn animation but this will take a lot of time and drawing so I may have to re-think. Possibly do cut out drawings for the main characters or single line drawings, using the ones I used for my posters/leaflet.

Idea: start from a single line pencil drawing of a sad child which, when joining a craft and reading group for the first time, gradually becomes more cheery and happier. Would also apply to their parent/carer. Theme: that these sessions allieviate isolation, help child/carer become part of the community and learn/play together at the same time. Use photo or collage for background? A tracing or fairly opaque background - stronger line drawing - must show on top of the background.

Looked at The Stone Mason's Mallet by Ben Mason - a great cut out drawn animation example (not available on YouTube)
http://news.bbc.co.uk/local/norfolk/hi/people_and_places/history/newsid_8527000/8527133.stm

Find a style I really like and then speak to Julie about this and if I can use it.

Asked about practicalities of a drawn animation

Use a peg bar (need to make one or get one). Use this to attached each sheet of paper.

Paper/frame will be A4 size